

HELMET OF THE ANCIENTS
Seven pharaohs sleep under the desert, and each one was buried with a piece of the same helmet. Break into every tomb, take the key from the dead king, and carry the fragment out — seven times over. Then bring the pieces to the ancients' forge and choose what they become. Choose well: the forge answers each soul only once.
Every tomb follows the same shape: pass its trial, kill its king, spend his key. Seven tombs give the seven pieces; the eighth — Ashmunrah's — gives the right to use the forge.
1
 Omruc
The Peninsula Tomb
Omruc
The Peninsula Tomb
Shredderthrowers and magicthrowers guard the way in.
No riddle here - the trial is the gauntlet itself. His entry portal is open to anyone who survives the walk to it.
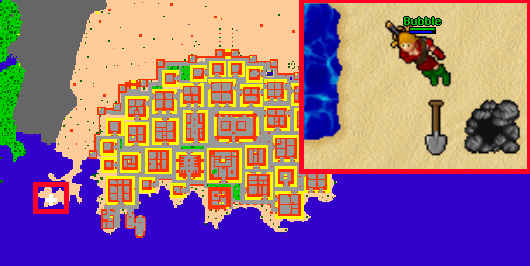
To find Omruc, enter the hidden Peninsula Tomb on the shore west of Ankrahmun. The way in is a buried hole: bring a shovel, and dig the sand more than once if it refuses to open.
Head down to the fifth level below ground and follow the map to the empty coal basin — the trail runs from the stairs you arrive by all the way to the basin chamber.
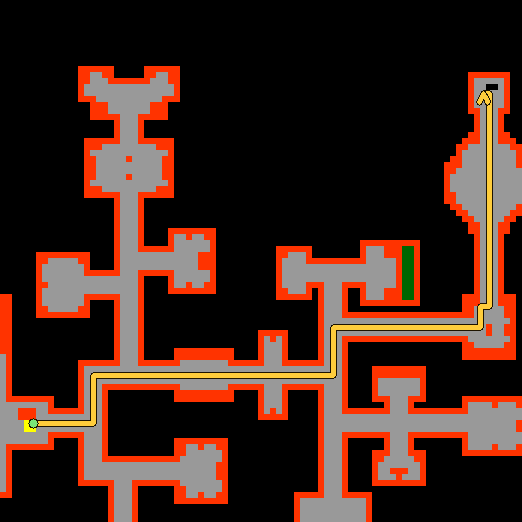
On other worlds the flame demands a scarab coin in the coal basin — not here. Step straight onto the mystic flame beside the basin and it carries you onward, coin or no coin. Then follow the map below.
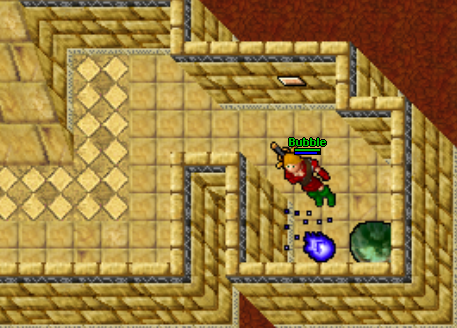
The flame sets you down one floor below. Follow the trail south through the halls — it ends at the stairs that take you further down.
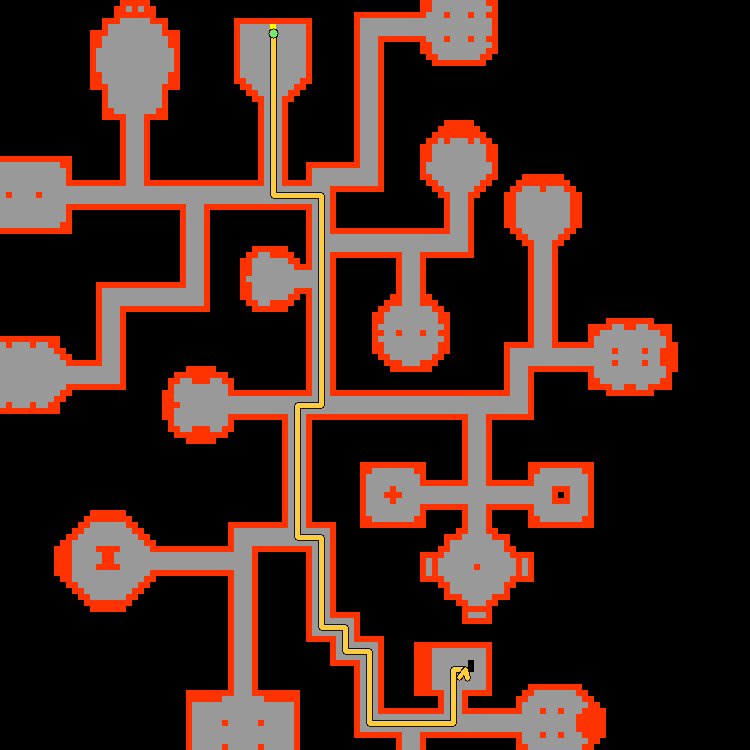
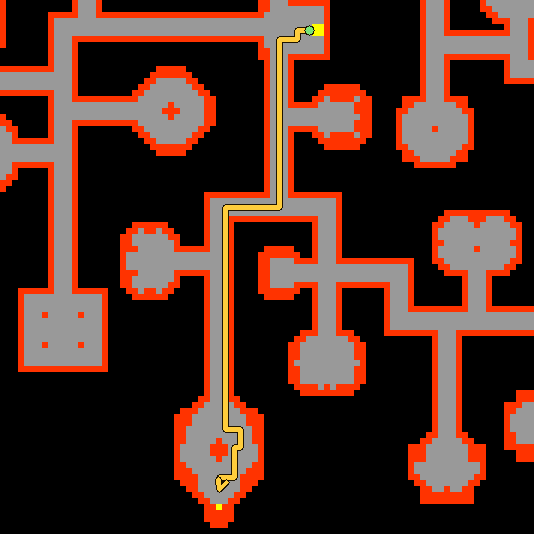
From the stairs, follow the map below to the maze teleporter — it waits in the pointed chamber at the trail's end.
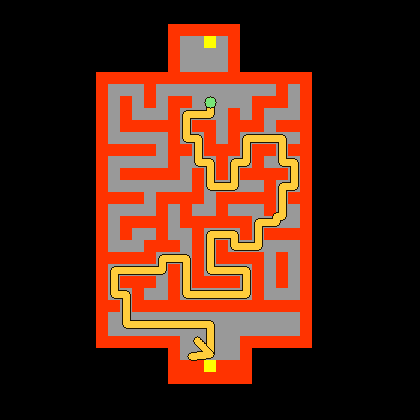
The teleporter drops you in a small chamber. Leave the forcefield beside you alone — it throws you out of the tomb. Instead open the gate of expertise to the south (level 75) and step into the maze. Its walls are invisible in game: you walk against thin air. The map below shows them revealed — follow the gold line exactly and you come out at the forcefield that carries you onward to Omruc.
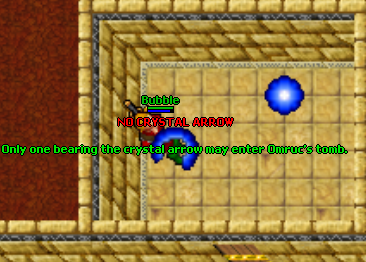
Lastly, step into the forcefield at the maze's end. It sets you down in Omruc's own chamber, where 2 stalkers, 5 magicthrowers and 3 shredderthrowers hold the floor with him — the throwers hit from range, so clear room to move before you commit. Kill Omruc, take his crystal arrow, spend it on the relic gate and claim the helmet adornement from the sarcophagus beyond. And bring the arrow before you step on the gate: without it the tomb turns you away, as below — only one bearing the crystal arrow may enter.


2
 Rahemos
The Oasis Tomb
Rahemos
The Oasis Tomb
The weakest pharaoh, but the scarab and larva swarms outside never stop coming.
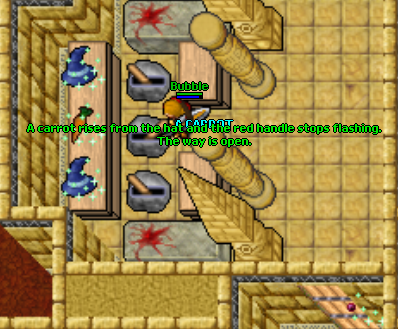
A dead magician guards this way with his hat. Pull the handle and something comes out: usually a stuffed rabbit and a gout of flame that burns you for 200 - but sooner or later, a carrot. The carrot is the key. Keep pulling, and keep hitpoints to spare.
To find Rahemos, seek out the hidden Oasis Tomb in the desert north of Ankrahmun. Like the Peninsula Tomb the way in is a buried hole: bring a shovel and dig by the cactus until it opens.
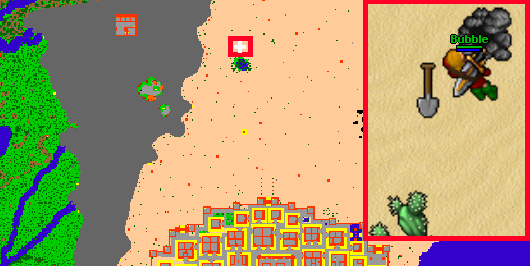
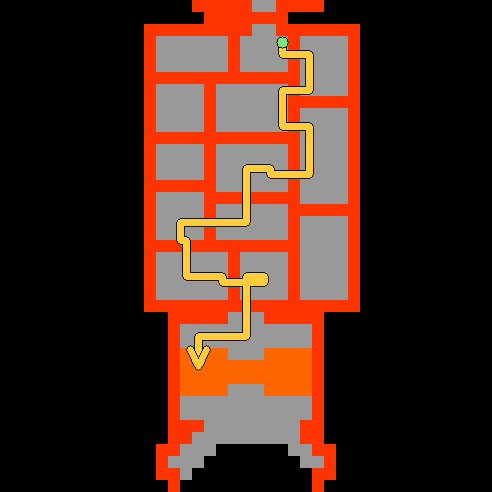
After entering, go exactly as the map below leads — east down the long hall, then south-east to the chamber at its end.
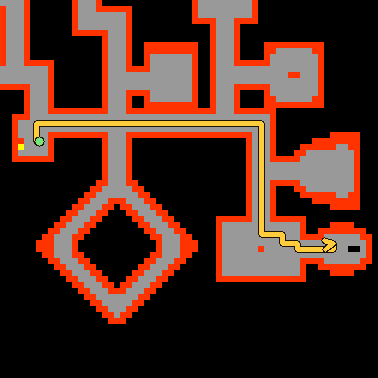
One floor down, keep following the trail — south from the stairs, down the slope, then west along the long corridor to its end.
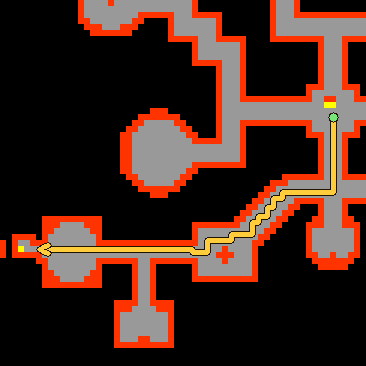
Deeper still, the trail runs south and then east into the last chamber, where beholders, necromancers and a pack of green djinns come at you at once — there is no getting around a dwarven ring here. Continue right towards the teleporter: a warlock guards it. Push him into the corner between the coffin and the teleport so he cannot slip away, kill him, and step through.
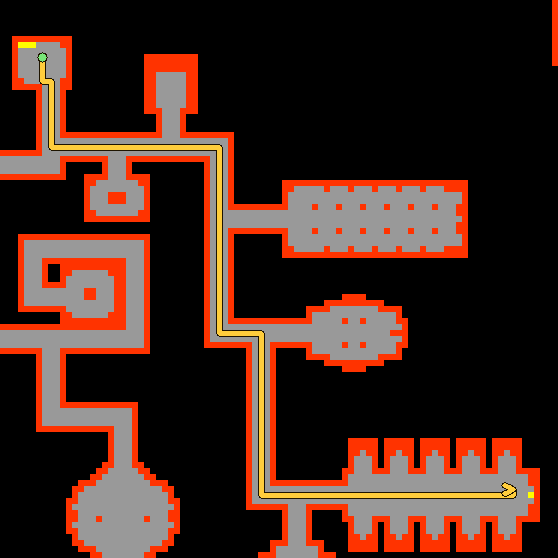
Each member of your team must find the carrot under one of the three hats before the door opens — the carrot is yours alone, a teammate's luck does not carry you through. Guess wrong and the hat coughs up a stuffed rabbit and a gout of flame for 200 hitpoints. Keep pulling until the carrot rises, as below.
Behind the door waits a walled maze. Ignore the switches you pass — they do nothing for you. Follow the gold line through the chambers instead, out the southern passage and down to the stairs at its end.
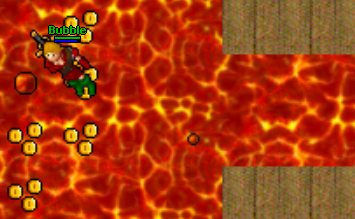
On the way you must cross the lava. It looks deadly, but part of the flow is solid ground — the coins in the picture mark the tiles you can safely walk. Step only where they lie.
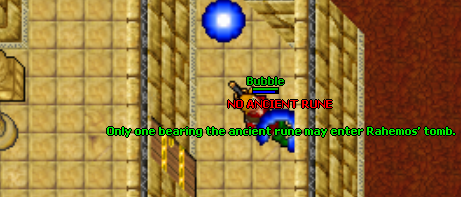
Down the stairs, mind the flamethrower and the pair of illusions on the way to the teleporter. It carries you to Rahemos himself, flanked by a warlock and a magicthrower. Kill him, take the ancient rune he always drops, spend it on the relic gate and claim the helmet piece from the sarcophagus. And carry the rune before you step on the gate: without it the tomb turns you away, as below — only one bearing the ancient rune may enter.


3
 Dipthrah
The Mountain Tomb
Dipthrah
The Mountain Tomb
The busiest approach on the whole quest: ghouls, mummies, vampires, a lich and green djinns.
The Mountain Tomb tests your path: rows of doors, and only one of each pair is right. The wrong door quietly resets your progress. Hold the true line to the gate - and it forgets you on the way through, so the doors must be walked again next time.
To find Dipthrah, head for the Mountain Tomb where the desert meets the rock north-west of Ankrahmun. The way in hides by the rubble on the mountain ledge — dig it open and climb down.
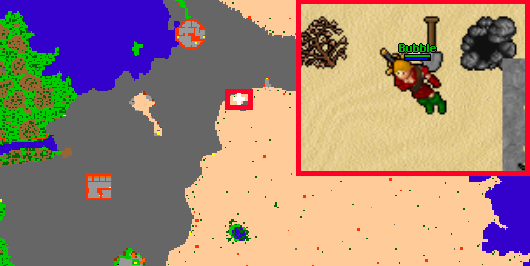
Inside, go as the map indicates — straight down the long western corridor to the chamber at its end.
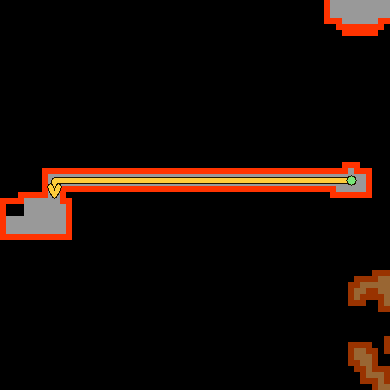
Keep descending to the sixth level below ground of this tomb, where the coal basin and its mystic flame await — step onto the flame and it carries you onward.
Deeper in stands the forcefield that carries you onward — but it refuses everyone at first. As it tells you itself: you must touch all eleven ancient seals before you can enter.
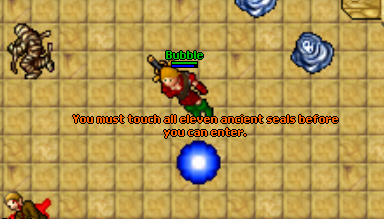
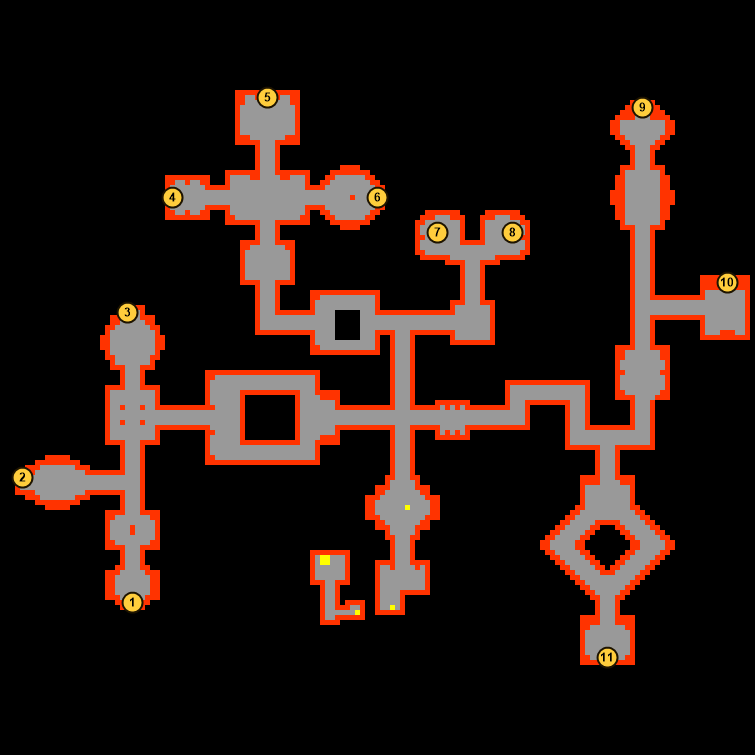
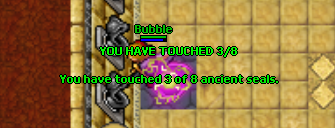
Here this tomb differs from every other world: there are no levers. Eleven ancient seals lie on the floor, and every player who wants through must step on all eleven personally — a counter floats over your head as you collect them, and once the last seal answers, the tomb remembers you forever. Only then does the forcefield let you pass. The map marks all eleven.
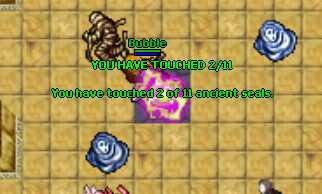
Each seal answers with a burst of light and counts you up, as below — you always know exactly how many you still owe.
Through the forcefield, follow the map — west out of the arrival room, then straight south down the long hall to its far end.
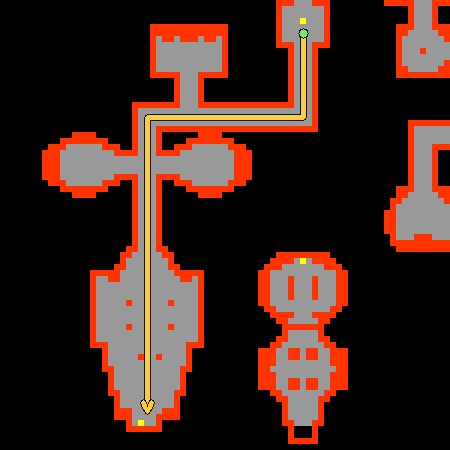
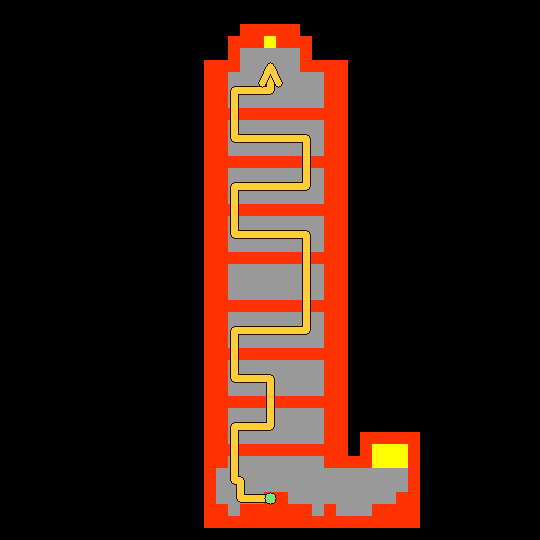
After the teleporter, head south past the level 75 gate of expertise — and then comes the trial: rows of doors, only one right in each. Walk north through the doors named endless, pale-faced, deceased, unholy, doomed, righteous, sharpened and mortal, exactly as the gold line below weaves. One wrong door and the run quietly resets — back to the start you go.
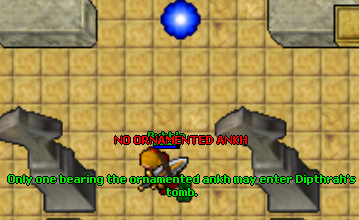
Past the doors, the forcefield carries you on towards Dipthrah. Kill him, take the ornamented ankh he always drops, spend it on the relic gate and claim the damaged helmet from the sarcophagus. And carry the ankh before you step on the gate: without it the tomb turns you away, as below — only one bearing the ornamented ankh may enter.


4
 Vashresamun
The Ancient Ruins Tomb
Vashresamun
The Ancient Ruins Tomb
Ghosts and banshees drift through here - bring a way to hit the invisible.
Her tomb answers to music: five instruments must be played in the right order. Strike a wrong one and the melody starts over. When the last note rings true, her sealed door swings open for you.
To find Vashresamun, enter the Ancient Ruins Tomb by the coast east of the desert — the way in hides by the rubble at the ruins. Bring a shovel and dig it open.
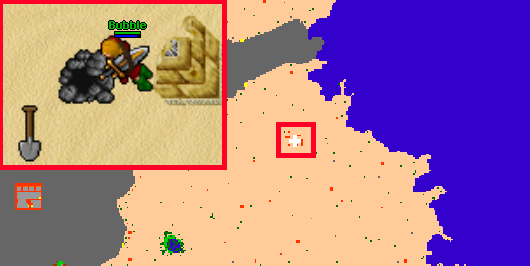
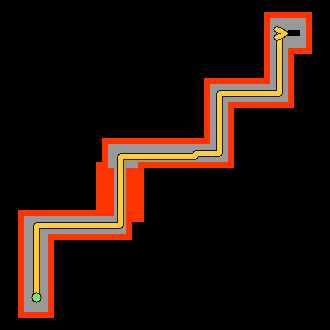
Inside, the passage climbs north-east in steps — follow the trail all the way up to the chamber at the top.
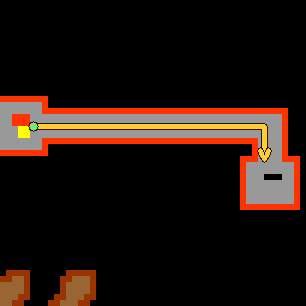
One floor down, follow the long corridor east to the chamber at its end.
From there, keep going all the way down until you reach the coal basin and its mystic flame — step onto the flame and it carries you onward.
After teleporting into the deeper tomb, follow the map below — south down the long corridor, then west to the stairs that take you to the next floor.
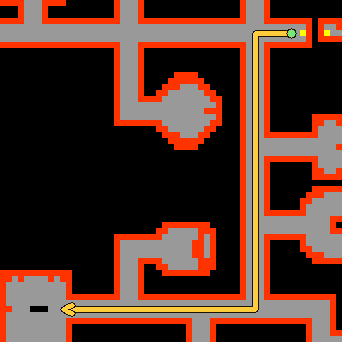
Down the stairs, keep west — through the halls and along the long corridor until the trail ends in the far western chamber.
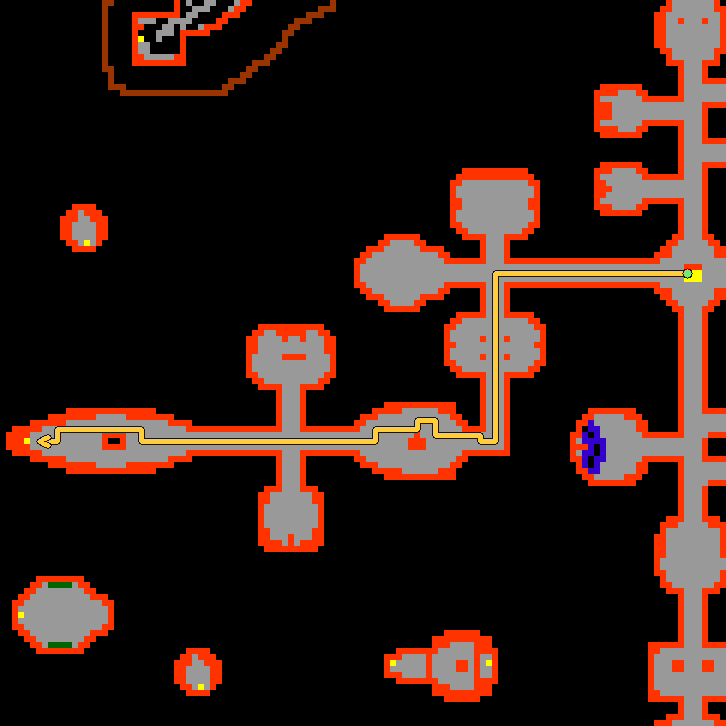
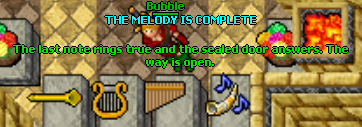
Step into the teleporter and pass the level 75 gate of expertise. Then her trial: play the five instruments in the order below — the drum, the panpipes, the mandolin, the lyre and the horn. Strike a wrong one and the melody starts over. When the last note rings true, the sealed door answers and the way is open.
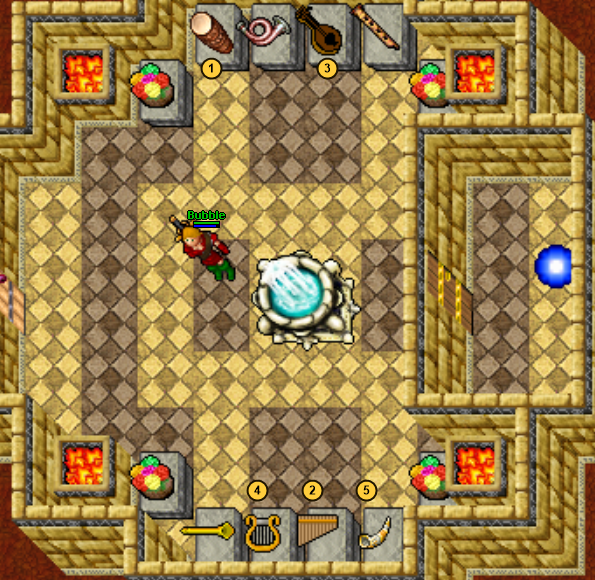
Play them right and the tomb tells you so — the melody is complete, and the way is open. Enter the next teleport and meet Vashresamun.
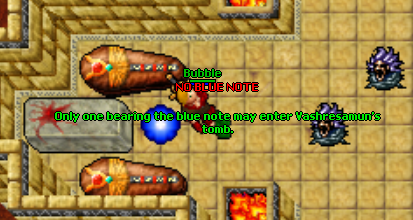
Kill her, take the blue note she always drops, spend it on the relic gate and claim the left horn from the sarcophagus. And carry the note before you step on the gate: without it the tomb turns you away, as below — only one bearing the blue note may enter.


5
 Morguthis
The Tarpit Tomb
Morguthis
The Tarpit Tomb
The toughest pharaoh of the seven, and behemoths roam the halls above him.
Seven flames burn through the Tarpit Tomb - though here they are not flames at all but thrones: step on one and the tomb counts it, and a tally floats up telling you how many of the seven you have lit. Light every one, then take the gate. Get there short and it turns you away with "the way stays shut". And unlike the seals, the flames go out again the moment you pass - every run into Morguthis means lighting all seven anew.
To find Morguthis, seek out the Tarpit Tomb north-east of Ankrahmun, by the great tar pit in the desert. The way in hides beside the rubble at its edge — bring a shovel and dig it open.
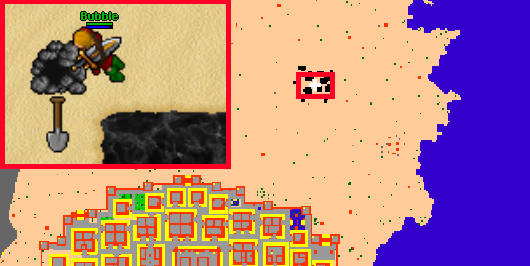
Descend towards the flame teleport — the ramps down are easy to spot the moment you reach each floor. At the bottom waits the coal basin and its mystic flame: on other worlds you would throw a scarab coin into the basin, but not here — simply step onto the flame and it carries you onward, coin or no coin.
The flame sets you down in the deep tomb. Follow the map — north around the great pyramid hall, west along the corridor, then north-west to the trail's end.
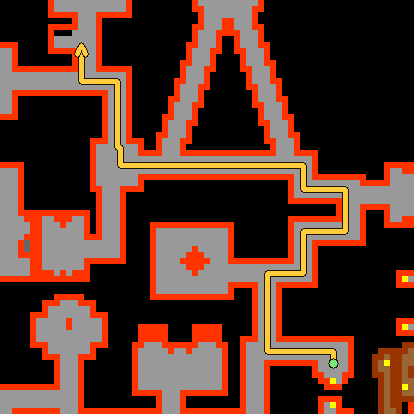
One floor down, keep following the trail — north, then south down the passage and east along the long corridor into the pillared hall at its end.
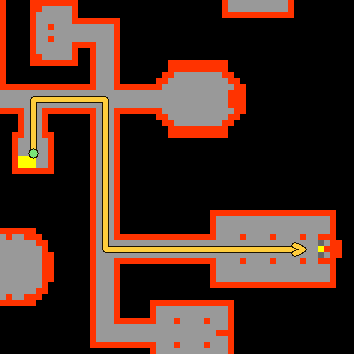
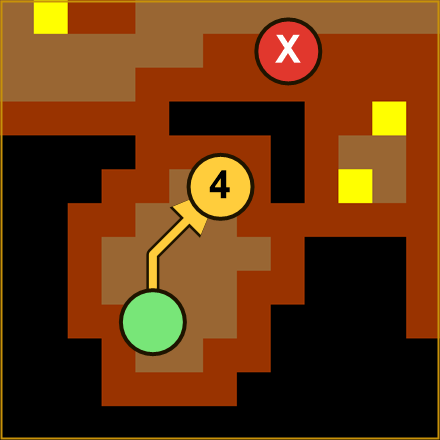
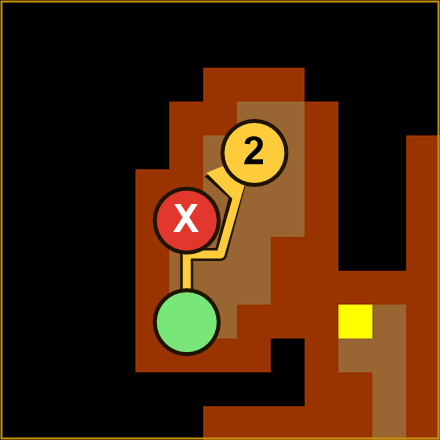
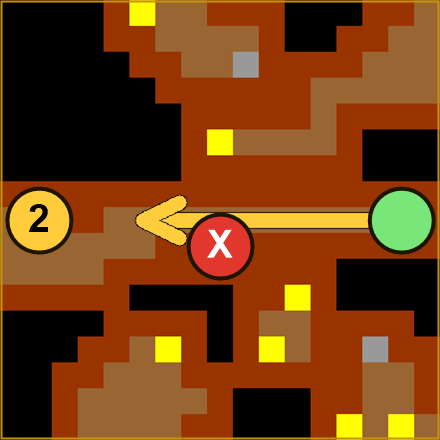
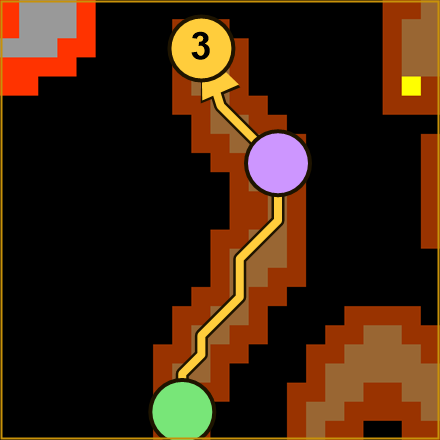
From here the tomb becomes a chain of errands, one per flame. Each errand is a run out
through the trapdoors, one throne touched at its far end, and a teleporter that carries you
straight to the start of the next errand — so the runs follow one another without a
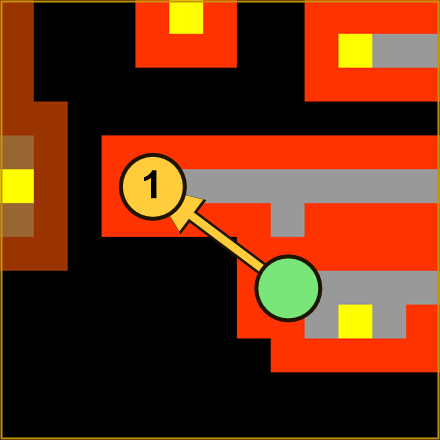
walk back. Bring a rope. Read every map the same way: green dot = where you stand or
land, the arrow shows where to walk, the gold number is what you do there, purple is
a throne (touch it) — or purple with a number when the throne is that whole panel's
errand — and a red X is a trap teleporter: step in and it throws you
back up a floor, errand lost.
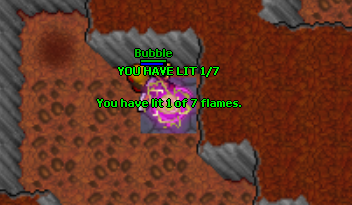
Touching a throne looks like this — it flares, and the tomb tells you how many of the seven
you have lit. Step on one you have already lit and it answers "ALREADY LIT" instead, so you
can always tell the two apart.
A dance down and back up through three floors. Six moves, then the teleporter.
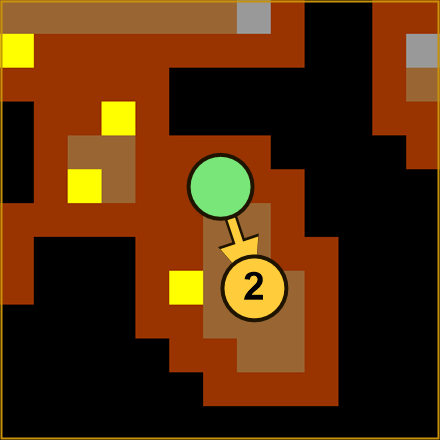
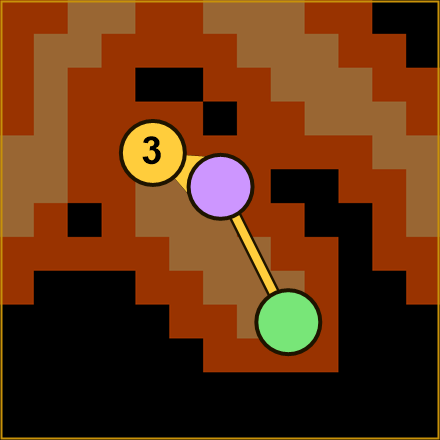
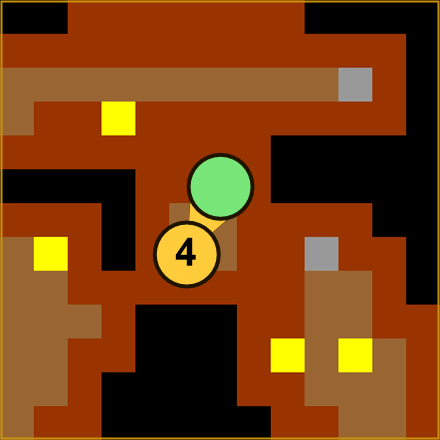
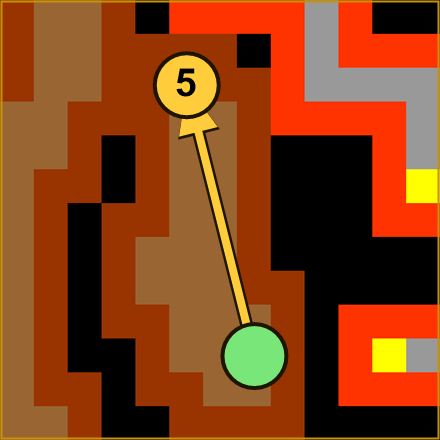
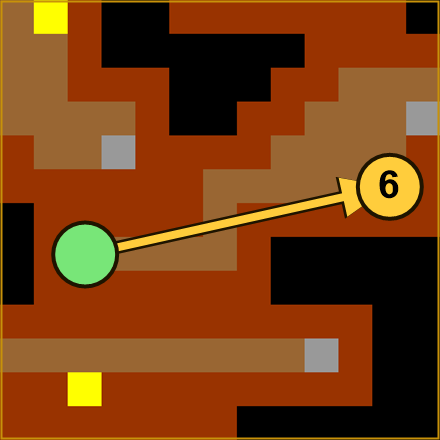
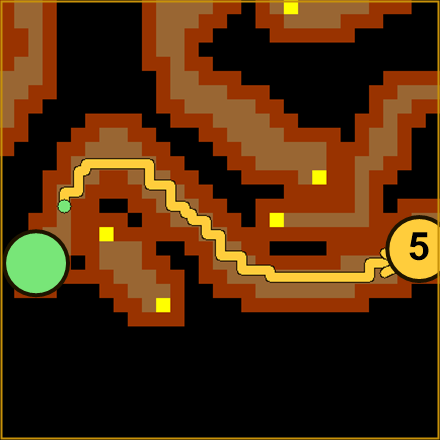
The longest of them. You land in a chamber with a Deathslicer: the blocker holds it while the rest of the team runs for the sinkhole. Two trap teleporters wait along the way.
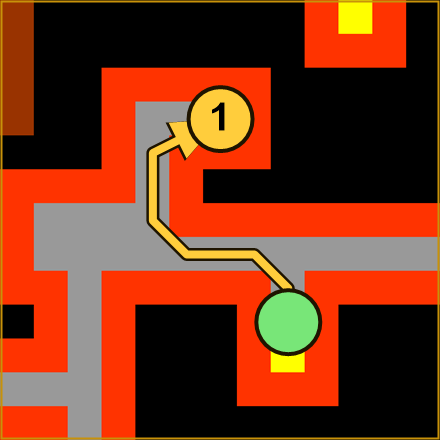
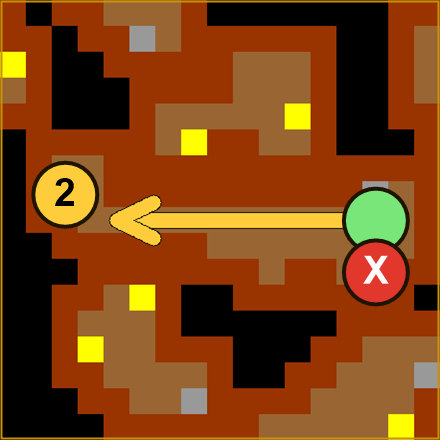
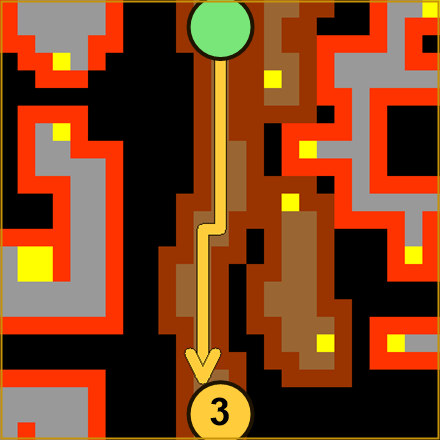
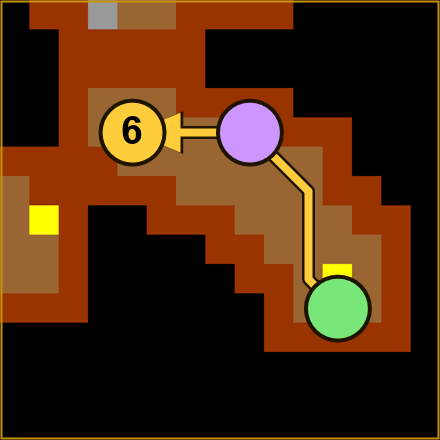
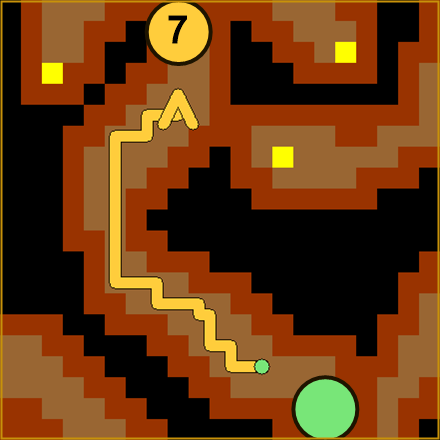
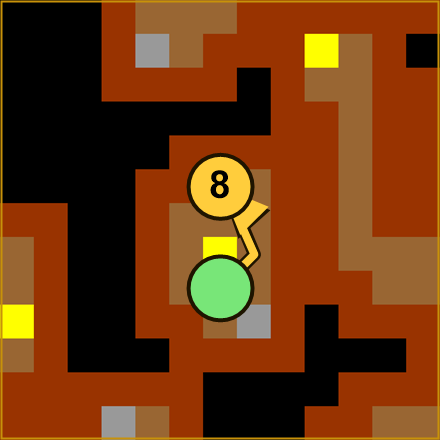
Short and mean: one drop, one trap to ignore, and a long curve south along the wall.
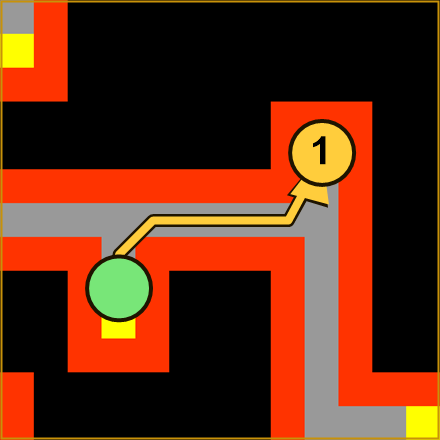
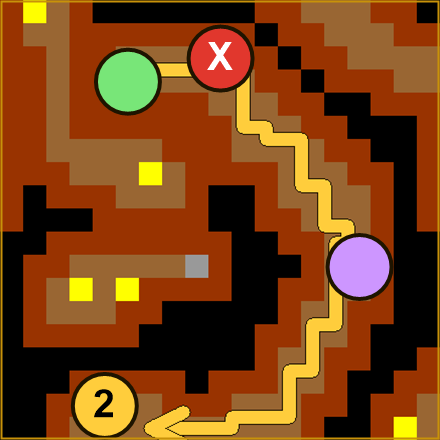
Down two floors, east the length of the tomb, then up and north to the loneliest throne of the seven.
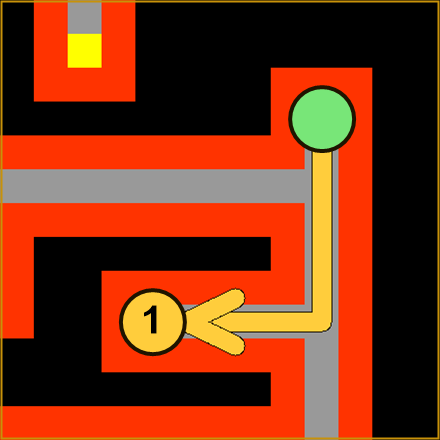
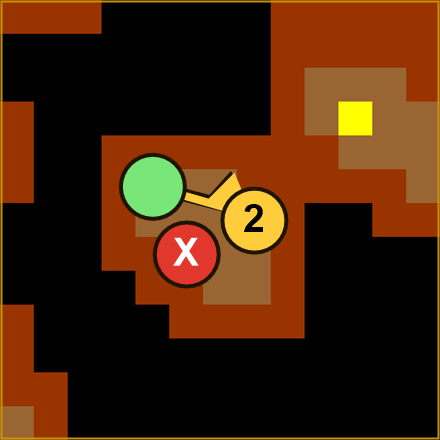
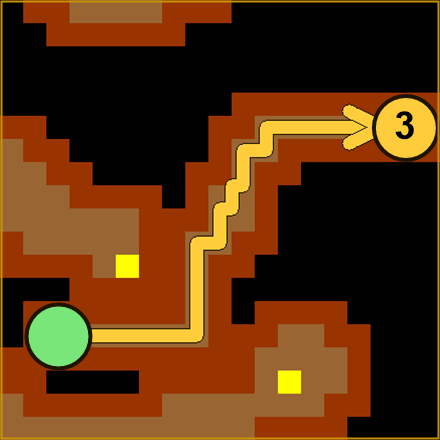
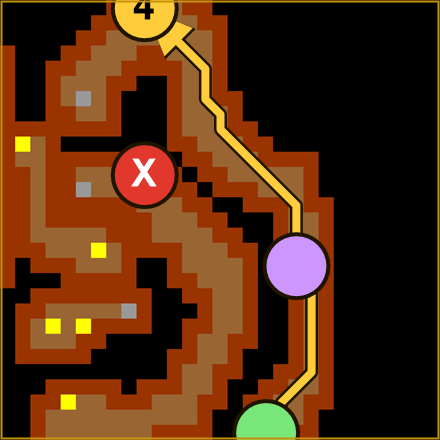
The longest errand of the seven: eight moves that carry you down, back up, and all the way across the tomb to the west. Rope in hand the whole time.
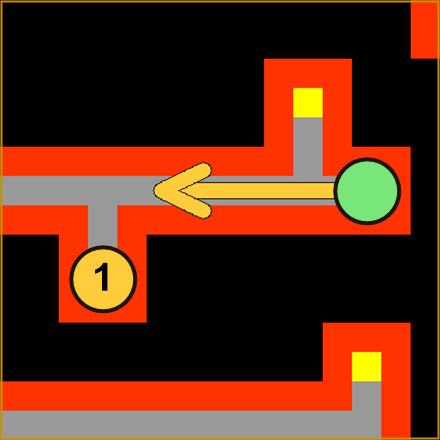
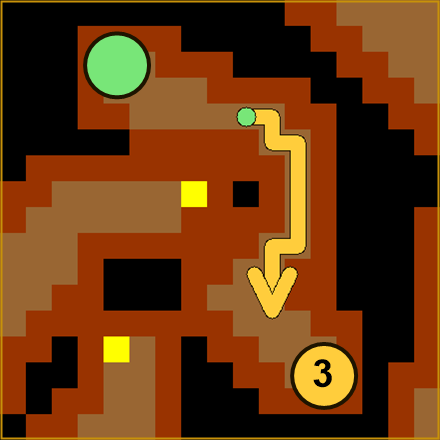
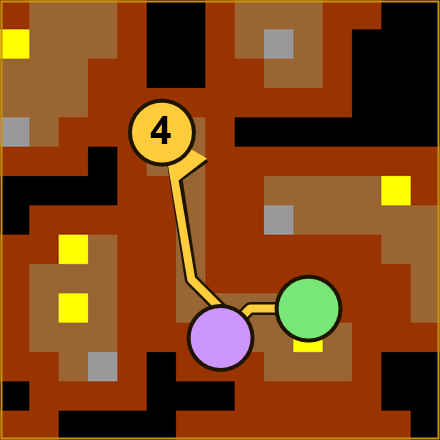
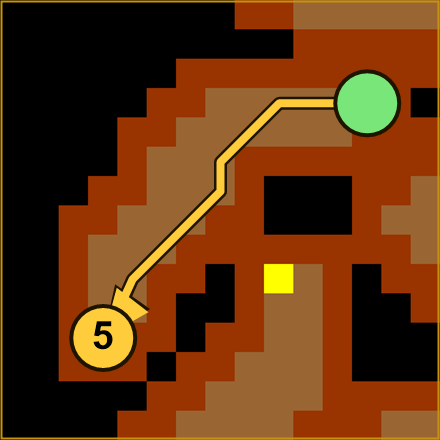
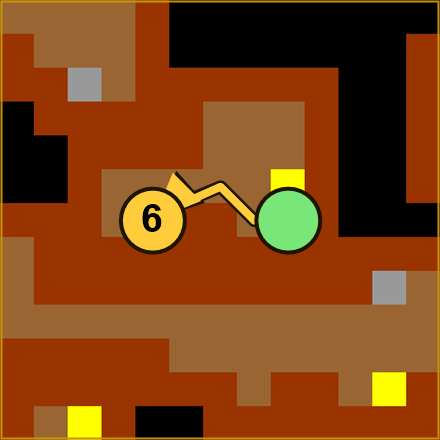
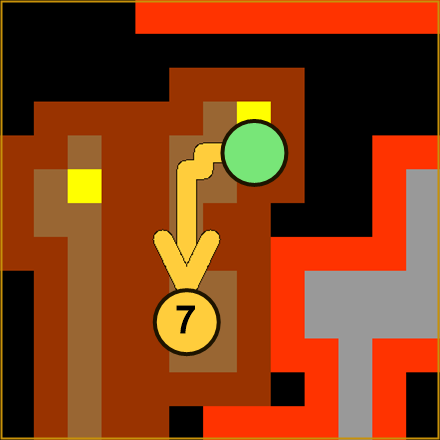
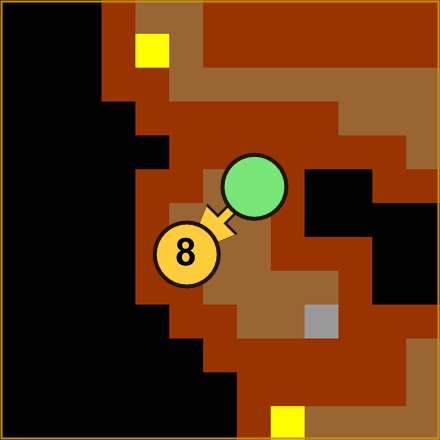
West again, and deeper. The throne sits at the bottom of a long winding descent.
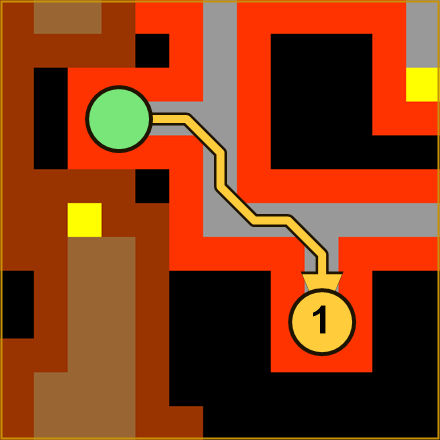
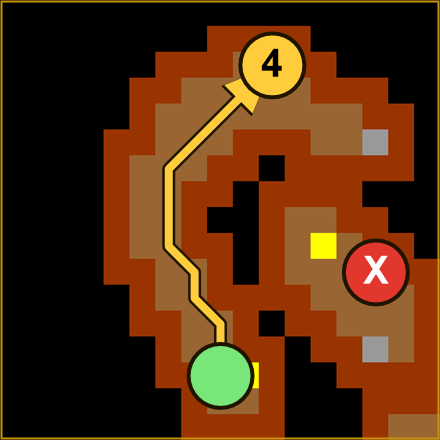
The last one, and the deepest reach of the tomb: a long run east along the bottom floor to the loneliest throne, then a curve back south-west.
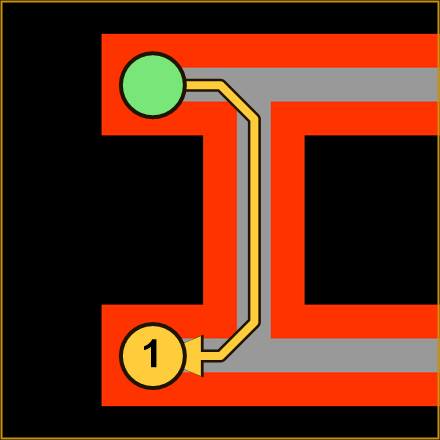
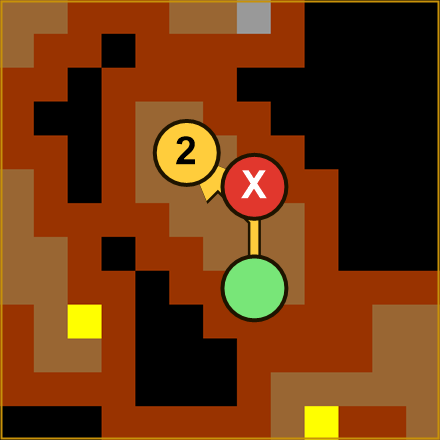
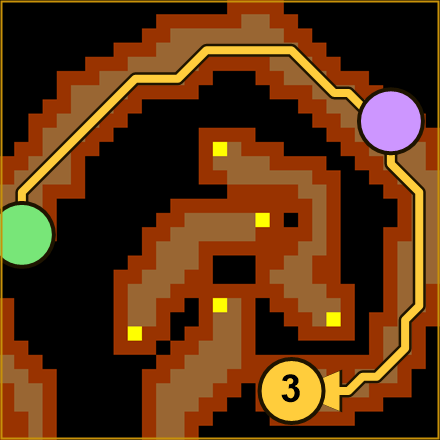
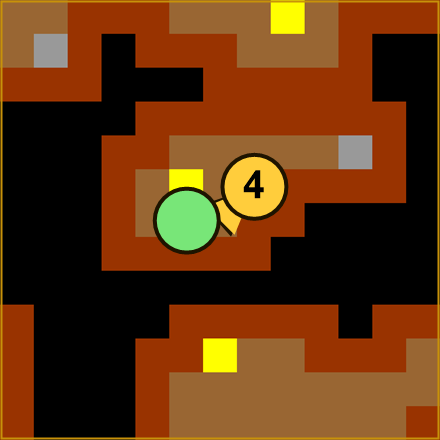
Seven of seven, but you are at the wrong end of the tomb. The road back to the gate runs through two stretches you have already walked — first the rooms of Errand 3. The throne you pass is already lit: walk straight by it, there is nothing left to touch.
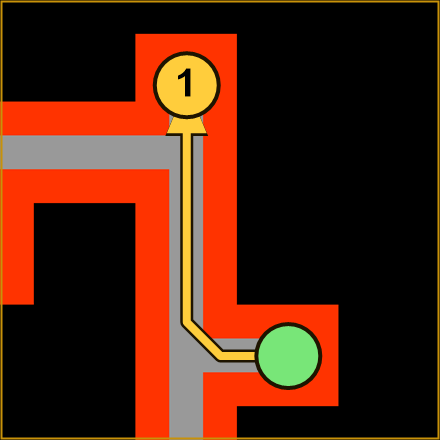
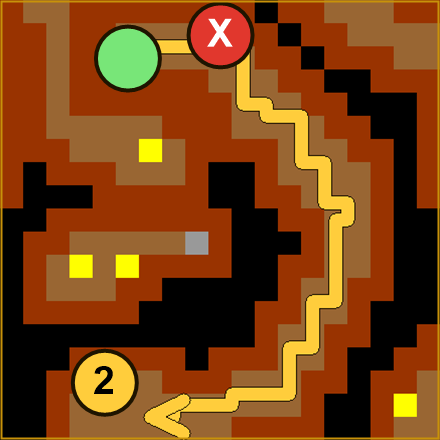
Then the rooms of Errand 4, exactly as before. Rope in hand again, and again the throne on the way is already lit.
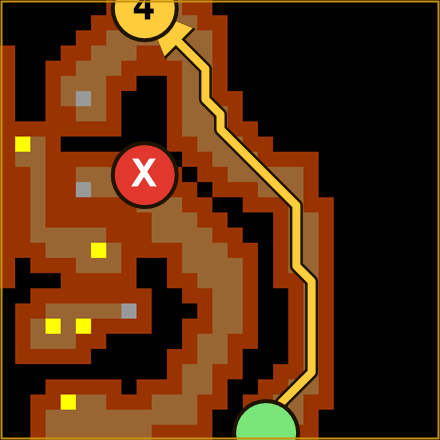
You land a few steps from the gate. Step onto it: it reads your tally, opens, and sets you down in Morguthis' own chamber. Come here one flame short and it turns you away with "the way stays shut". And mind that passing the gate puts every flame out again — a second run at Morguthis means all seven errands anew.
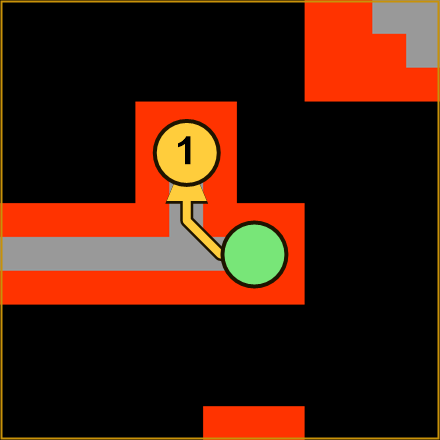
Before you spend anything, know this about the chamber. A hole is cut in the floor a couple of steps from where the gate sets you down — walk into it and you drop to the room below, where a ladder takes you straight back up. It is there so a team never has to run the seven errands once per member: drop down, wait out the respawn, climb up and kill him again, and everyone collects their sword hilt on the same trip. Leave the tomb instead and the flames are out — the whole circuit starts over.
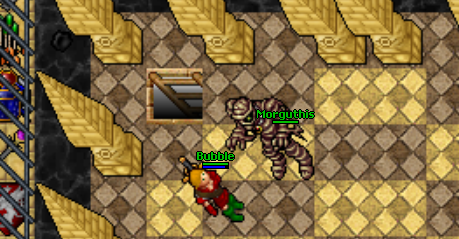
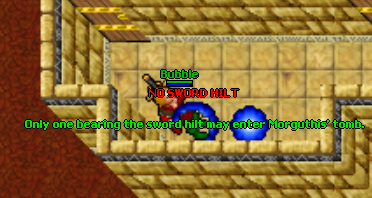
The gate sets you down in Morguthis' own chamber, and he does not hold it alone: eight shredderthrowers ring him, and they respawn fast enough to matter — clear room to move before you commit. Kill Morguthis, take the sword hilt he always drops, spend it on the relic gate east of the chamber and claim the right horn from the sarcophagus beyond. Carry the hilt before you step on that gate: without it the tomb turns you away, as below — only one bearing the sword hilt may enter. Here that bounce costs more than at the other tombs: it drops you back at the tarpit's beginning with every flame already out, so all seven errands must be run again before you can even reach him.


6
 Thalas
The Stone Tomb
Thalas
The Stone Tomb
Necromancers and plaguethrowers stand between you and the door.
Eight ancient seals lie scattered through the halls. Step on every one - a count floats up as you go - and the forcefield to his chamber opens. The seals remember you forever: touch all eight once and this door never closes to you again.
To find Thalas, seek out the Stone Tomb out in the open desert north-east of Ankrahmun. Look for the scatter of dark stones on the sand — the way in is buried beneath them, so bring a shovel and dig it open.
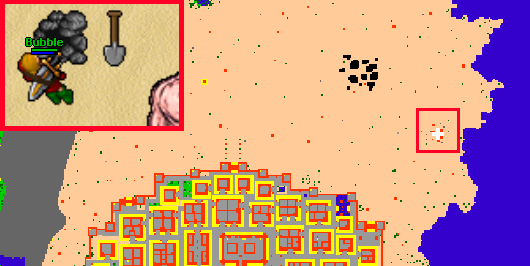
Climb down to the sixth level below ground. The descent is a chain of ladders and stairways, each easy to find once you reach its floor, and at the bottom waits the coal basin with its mystic flame. On other worlds the basin wants a scarab coin — not here. Step straight onto the flame and it carries you into the tomb proper.
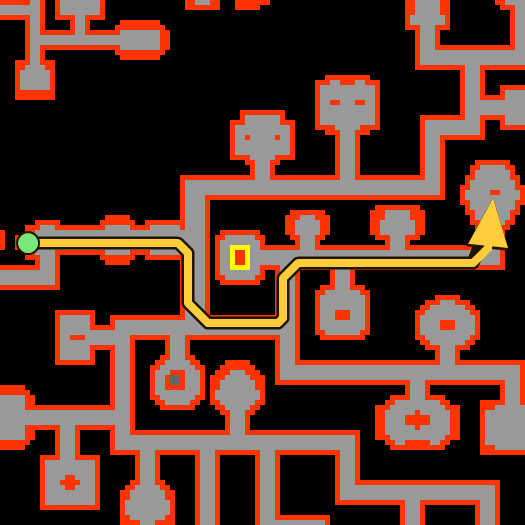
The flame sets you down at the western end of a long hall. Follow the map east, down through the middle passage and east again along the great corridor, all the way to the stairs at its far end — you will know them by the cobra statue standing beside them. Take them down.
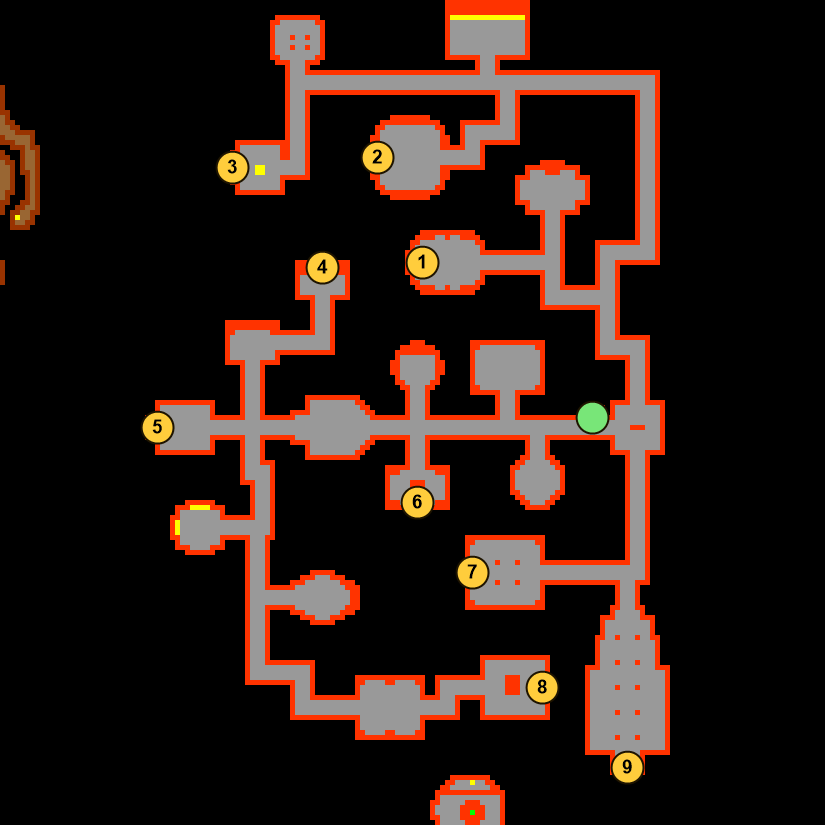
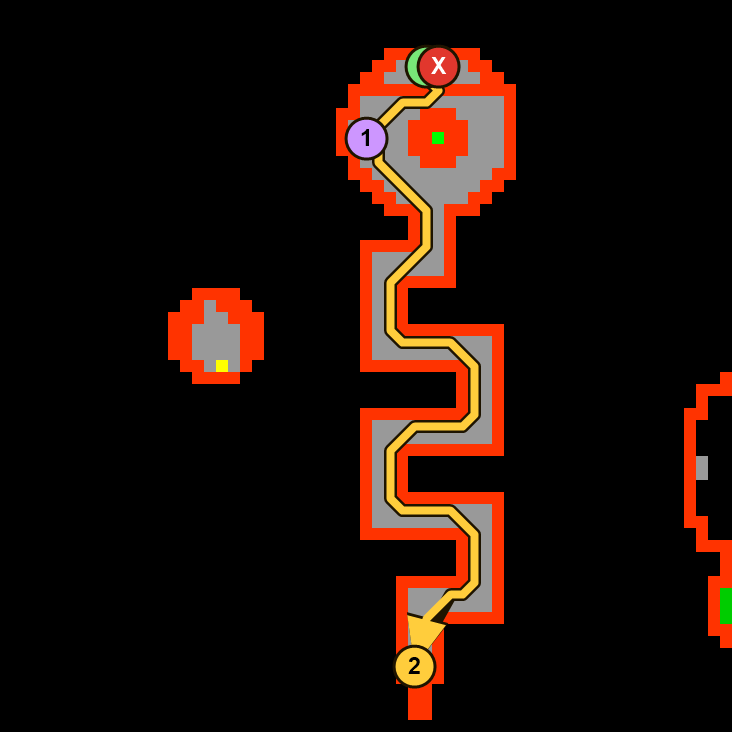
Below lies the seal floor, and here the Stone Tomb parts company with every other world: there are no levers. Eight ancient seals lie scattered through the halls, and every player who wants through must step on all eight personally — nobody can open the way for the rest of the team. A count floats over your head as you collect them. The green dot marks where the stairs put you down; the numbers are one tidy sweep of the eight, but the order does not matter — take them however suits you. When all eight answer, walk to 9 in the south-east corner: that is the forcefield the seals unlock, and it carries you onward to Thalas.
Each seal answers with a burst of light and counts you up, as below — you always know exactly how many you still owe. Step on one you already hold and it pushes you off with "ALREADY TOUCHED" instead, so a missed seal is never a mystery. And once the eighth answers, the Stone Tomb remembers you forever — this circuit is walked once per character, never again.
The forcefield drops you inside the cobra's head — look at the map and you will see the whole place is shaped like one. Do NOT step into the forcefield right beside where you land — it throws you out of the tomb. Pass the level 75 gate of expertise instead and step on the stone tile by the cobra's eye (purple): it poisons you, and that poison is the mark the tomb wants. Then run — down the winding body to the Cobra waiting in the tail, and greet it with hi while the venom still burns. Do not cure the poison, do not linger: fade too far and the Cobra only hisses "Begone! Hissssss! You bear not the mark of the cobra!" — then it is back to the switch for another dose.
Stepping on the tile looks like this — the venom takes hold, and the mark is yours. The clock is already running.
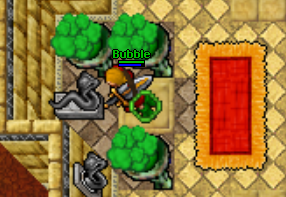
Say hi to the Cobra while poisoned and it answers "Venture the path of decay!" and casts you into Thalas' own chamber. He does not wait alone: six plaguethrowers hold the room with him and they return fast, and Thalas conjures slimes as he fights — up to eight at once. Clear space quickly or the room fills against you.
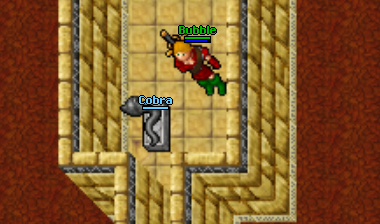
Before you spend anything, know this about the chamber. A hole is cut in the floor by the southern wall — drop through it and a ladder takes you straight back up. It is there so a team never has to run the cobra rite once per member: drop down, wait out the respawn, climb up and kill him again, and everyone collects their cobrafang dagger on the same trip.
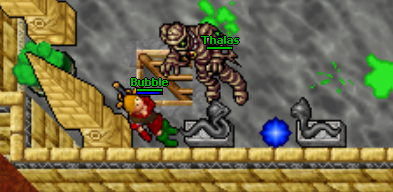
Kill Thalas, take the cobrafang dagger he always drops, spend it on the relic gate at the chamber's southern edge and claim the gem holder from the sarcophagus beyond. Carry the dagger before you step on that gate: without it the tomb turns you away, as below — only one bearing the cobrafang dagger may enter. The bounce is gentler here than at Morguthis: you land back by the seal gate, and since the seals remember you forever, all it costs is one more poison run down the cobra's body.
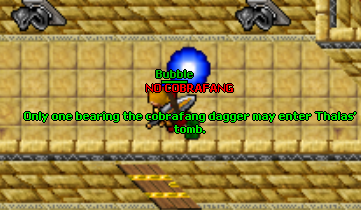


7
 Mahrdis
Dragons and a dragon lord share this stretch - the only tomb with real fire in the neighbourhood.
The gentlest way in of the seven: his entry portal stands open. Walk it.
To find Mahrdis, walk out of Ankrahmun's eastern edge, along the shore — his tomb hides right by the city, under a pile of dark stones on the sand. Bring a shovel and dig it open.
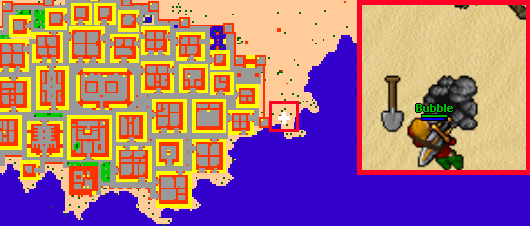
Climb down to the sixth level below ground — the ramps are easy to spot on each floor. At the bottom waits the coal-basin room with its mystic flame, but do not step onto the flame: walk behind it instead, down the stairs, and follow the map west on the floor below to the next stairs down.
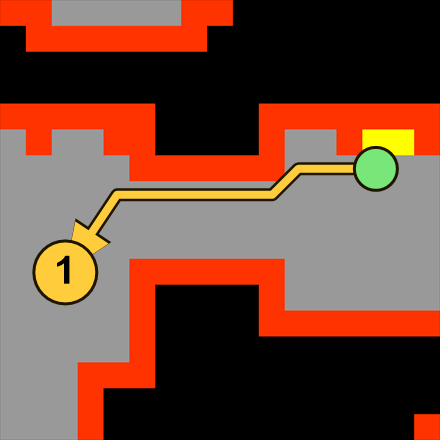
Two floors down now. Follow the long corridor — west along the wall, north up the great passage — all the way to the forcefield at its end, and step into it. This one is a friend: it carries you to the foot of the spiral tower.
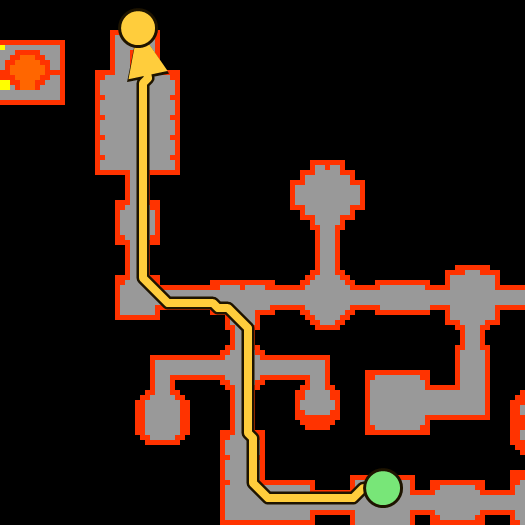
The forcefield sets you down at the spiral tower, and the way from here bounces across three floors. Do NOT step into the forcefield right beside where you land — it throws you out of the tomb.
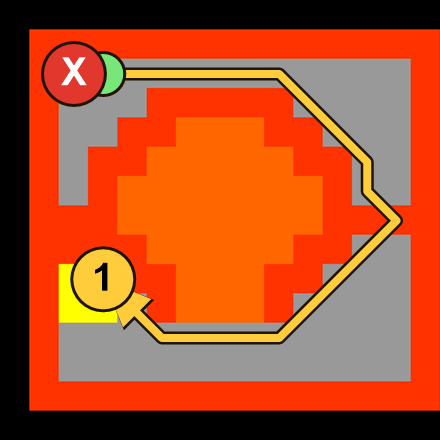
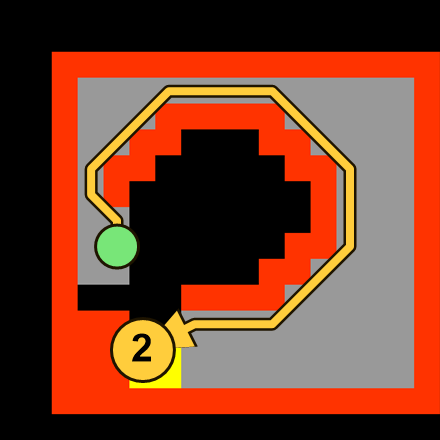
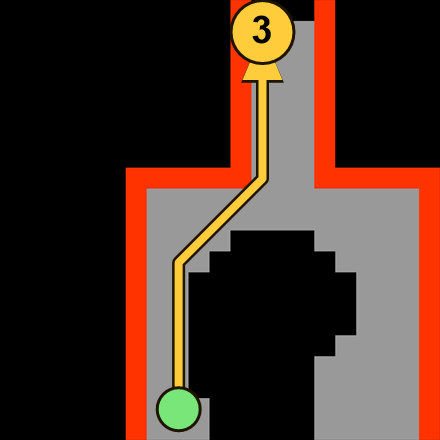
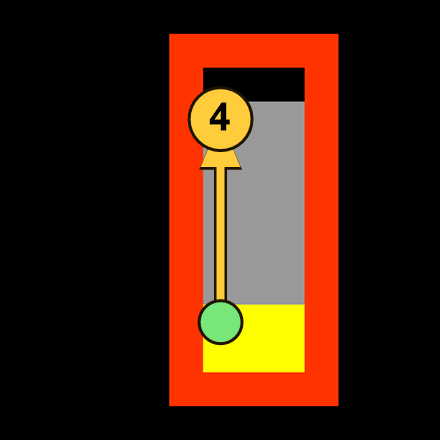
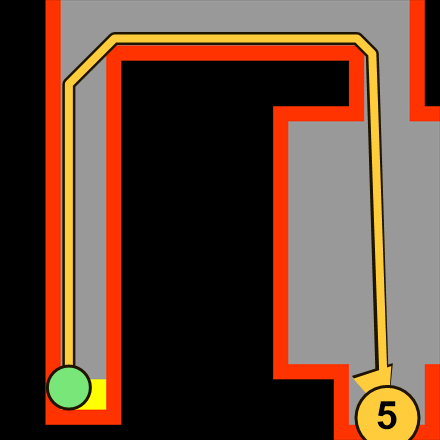
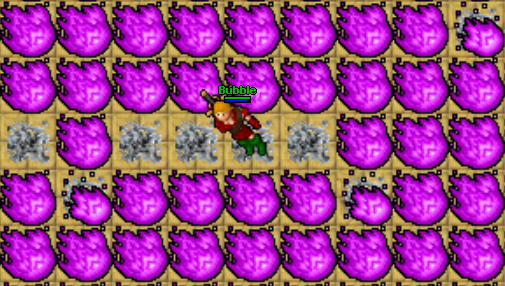
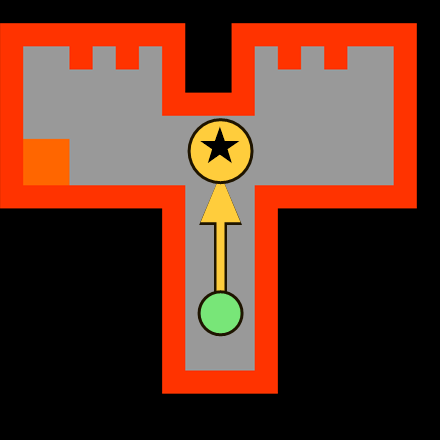
The last corridor burns with purple fire, as below. Step into it and it takes 300 hitpoints — so move square by square, onto cold tiles only. And if fire blooms beneath you while you already stand on a cold square, it does nothing: hold still, let it pass, and step on. Do not rush.
At the corridor's end stands Mahrdis' portal — open to anyone, no trial, no toll. Step through and you stand in his chamber: Mahrdis, flanked by 4 flamethrowers, 2 dragons and a dragon lord. The flamethrowers return fast — put them down first and keep clear ground to fight the dragons on.
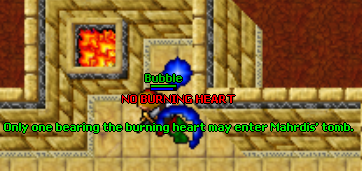
Kill Mahrdis, take the burning heart he always drops, spend it on the relic gate and claim the helmet ornament from the sarcophagus beyond — the forcefield right next to the sarcophagus then carries you straight out to the surface, part in hand. But carry the heart before you step on that gate: without it the tomb turns you away, as below — only one bearing the burning heart may enter. The bounce drops you back down by the tower, right beside the forcefield that leads out of the tomb — so the burning corridor must be walked again.


8
 Ashmunrah
The Library Tomb
Ashmunrah
The Library Tomb
The strongest pharaoh of the eight, and he stands four steps from where his portal sets you down.
Ashmunrah drops no key and guards no piece - the eighth pharaoh guards the forge itself. In his chamber stand six levers: pull all six down and the mechanism yields, the seal breaks, and you are cast out of the tomb. The forge remembers you were here forever - like the seals, this is done once per character and never again.
The eighth tomb hides in plain sight: inside Ankrahmun itself, beneath the city's own library. No shovel this time — walk in through the archway and take the way down.
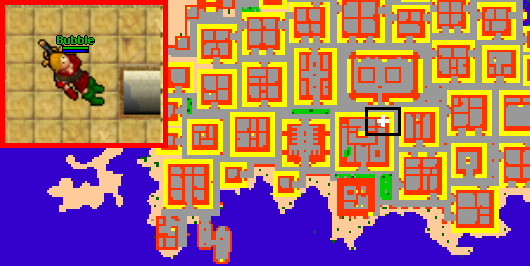
The way down winds through four floors of the old library, and ends in something no other tomb has: a maze whose walls cannot be seen. They show plainly on the maps below — and, mercifully, they burn red on your own minimap in game, so keep one eye on it as you thread through.
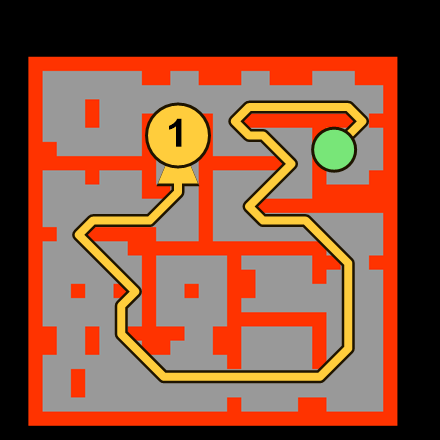
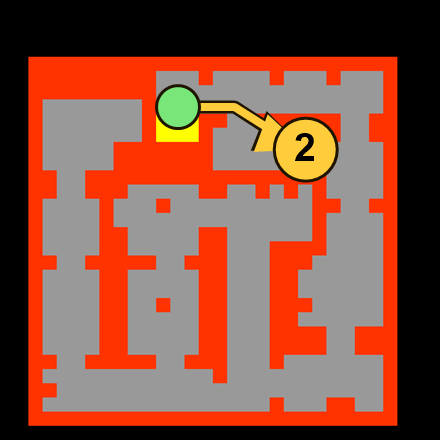
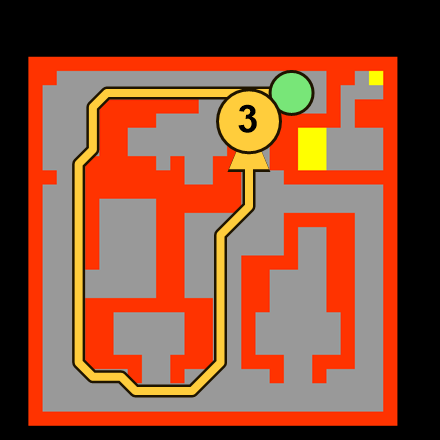
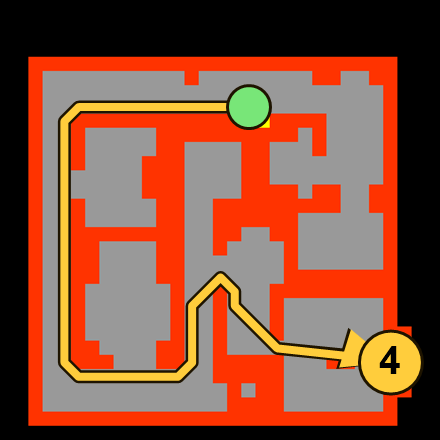
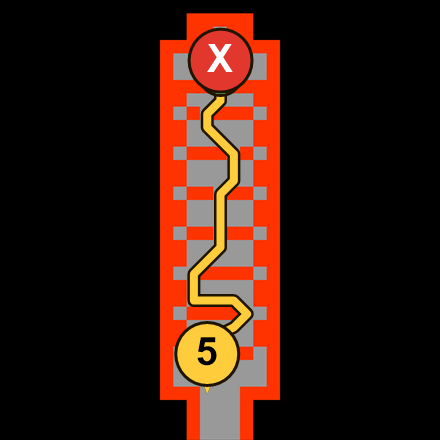
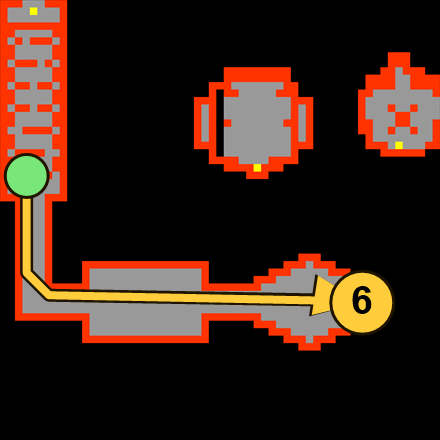
The portal is open to anyone — and it sets you down four steps from Ashmunrah himself, the strongest pharaoh of the eight, so arrive ready to fight. He holds no quiet court: behemoths, packs of ghosts, magicthrowers, crypt shamblers and dworcs crowd the chamber with him. Around its walls stand six levers — and they answer only while Ashmunrah lies dead: try one while he breathes and it refuses you outright. So kill him first, then pull all six down. Each lever locks as it falls and stays down until the forcefield resets the mechanism, so a team does this one member at a time — and if he rises again mid-queue, he must fall again before the levers listen.
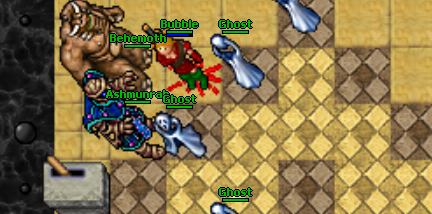
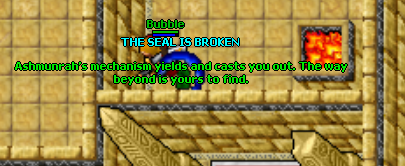
With the sixth lever down, step into the forcefield at the chamber's southern end. The mechanism yields — THE SEAL IS BROKEN, as below — and the tomb casts you out where you first climbed in. That is no failure: the forge now remembers you, forever. Like the ancient seals, this is done once per character and never again. Step on the same forcefield with a lever still up and it tells you so and shoves you back into the room to finish the job.
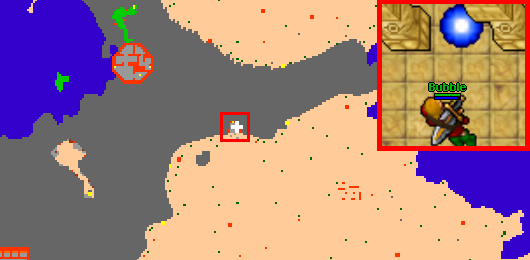
The forge hides deep in the northern desert, out at the barren edge past the tombs — the gate is a lone forcefield between two pillars, marked below. Walk it with all eight tombs behind you — the seven burial chambers and Ashmunrah's lever room, in any order — and it carries you inside. Step on it unready and it counts you out loud — "YOU HAVE WALKED x/8" — and names exactly which tombs you still owe. What it checks is passage, not possession: once you have walked a tomb it stays walked, and selling or losing a piece later can never close this door on you.
Beyond the gate lies the forge's own underworld — and passing the gate buys you two things at once: the way to your helmet, and the right to hunt Bonedemons, for this is the only place in the world they walk. The panels below lead the way; the forcefield beside where you land is the way out, open whenever you want it.
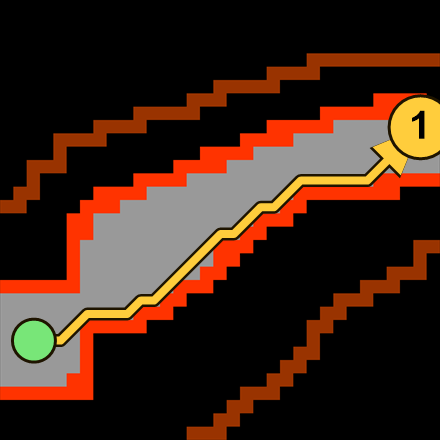
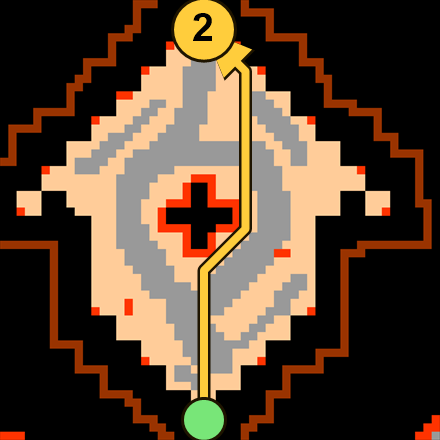
Bring all seven pieces to the vault, open the chest of your choosing, and the pieces fuse into that helmet on the spot. Choose with care — the forge serves each character once, for life.


Four chests, one choice. Hover a helmet to see exactly what it carries — then pick the one your character actually lives by.
Sapphirefor the mageEmeraldfor the knightRosefor the runnerRubyfor the survivorBring all four coloured helmets to the anvil and they can be crafted into one masterwork carrying every bonus of all four at full strength. Since the forge gives each character a single helmet, the other three must be bought from players who earned their own. The prismatic helmet is, by design, the most social item on the server.

